

Making the Mosquitor Mask – An Interview with Glen Coleman
Monday, August 6th, 2012 by Pixel Dan

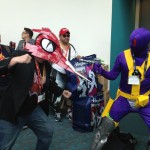
You may recall the challenge made to me by Scott Neitlich prior to this year’s San Diego Comic Con. And if you were at the show or saw pictures from it, then you know I was able to meet that challenge.
But I never would have been able to if it weren’t for the very talented Glen Coleman contacting me and offering to help me out by building an amazing Mosquitor mask! Many of you have contacted me and asked me how the mask was made, and I kept promising that once SDCC was all wrapped up, I would shine the spotlight on the man behind the making of that mask.
So, here we are. It’s time to talk to Glen Coleman! Click on through to learn how he did it, complete with images and video of the actual mask making process, and even grab the specs so you can try yourself!
Pixel Dan: Hi Glen! First, I want to thank you for making the amazing Mosquitor mask for me! If it weren’t for you, I don’t know what I would have done to meet the challenge from Scott Neitlich.
Glen Coleman: You’re very welcome Dan. The challenge really captured my imagination and am glad that I could help out.
PD: So, let’s start there with that mask. What can you tell us about the design process?
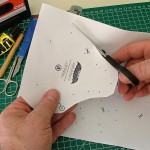
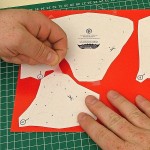
GC: Sure, the mask was initially sculpted in Google Sketchup, from some rough plans I had drawn. I then use another computer program called Pepakura Designer to unfold this computer model, giving me a set of flat two dimensional patterns to work from. I prefer to refine these patterns further using Adobe Illustrator, eliminating as much of the computer geometry as possible to favor the idiosyncrasies of the material it will eventually be made from. The next step is to print these patterns directly onto plain white (220gsm) craft card, so that I’m able to cut, fold and glue these patterns back into that three dimensional shape. This first blank paper model is often referred to as a rough mock-up. Now that it is a physical object it is much easier to see where improvements could be added to the design. Adjustments may be needed to make the design fit slightly better or to make it easier to construct the second time around. This often means repeating the steps mentioned above a few times until I’m happy with the overall look and construction.


You can see the difference between the initial mock-up compared to that of your prototype and again with the mask that I had just made for the video.
PD: Amazing! So now tell us where to go from there. How was it made?
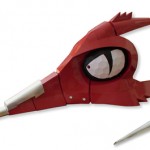
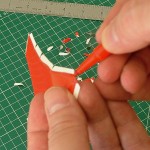
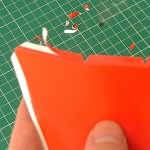
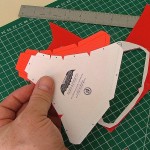
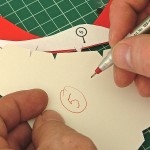
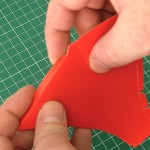
GC: I chose to make your mask from a thick gloss red craft card because I was keen for it to resemble the ‘plastic’ finish that the vintage figure had. It took me another month of searching after having shipped the prototype to you, before I finally managed to find the perfect red color for this project. As I had to make a second mask, to perfect a set of assembly instructions for this project, I took the opportunity to try out the new red colored card I had found. Gloss card is a little trickier to use than a plain craft card. For one thing you can’t print on to it. This meant that the patterns had to be printed onto standard 80gsm printer paper instead. Each part was then roughly cut out of the paper and taped to the glossy side of the red card. I can now use these printed patterns as guides to add the crease marks in the right place using an embossing tool and following the cut lines, accurately cut each part from the glossy card. One tip I would say is to write the part number on the back of the cut card shape so you don’t get confused. The other issue with gloss coated card is that the glue won’t adhere to the glossy surface so, to ensure each peace can be bonded together properly, all the glue tabs had to have their glossy layer peeled away to expose the card underneath after these tabs have been folded over. Finally, for a more professional finish, I also like to color the white cut edges of each part with a matching colored felt tip pen to blend the edge with the colored surface.
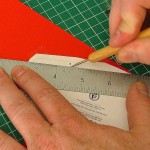
GC: To do papercraft at home, all you really need is large self healing cutting mat. A metal ruler is essential, as is a good craft knife. The only other thing you really need is an embossing tool for adding the fold marks. That’s it really, however for this project you may also need some sticky tape, a small pair of scissors and a selection of wooden dowels, varying in diameters. They always come in useful from time to time. Finally, a tool called a ‘bone folder, is something that I have found really useful but, it’s not essential. (You can just as easily use your fingers. After all, your hands are the best tools you have). The only other thing you’ll need is some glue. I used UHU glue for speed. This is a solvent based glue which does melt away the glossy surface of this type card so, I would recommend a water based PVA wood glue instead. Oh, and you will also need a hot glue gun to attach all the larger sections together toward the end of the build.
PD: How long did this mask take to make?
GC: About eleven hours to cut, crease and prepare all the component parts and then I’d say at least another twenty hours after that to glue it all together. However if you were to spread this over three or four weeks it’ll equate to only about an hour and half per day, which doesn’t sound quite as daunting a task when put that way. I think most people spend at least an hour or two a day working on their own hobbies right?
PD: Certainly! Some of us much more than that! So have you worked on designing any other masks in this style, perhaps more Masters of the Universe inspired designs? *cough* hint *cough*
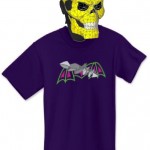
GC: Actually yes, it was your Mosquitor symbol t-shirt which was the inspiration behind developing a practical solution to your costume conundrum. The combination of mask and this style of t-shirt worked out so well in my opinion that I have been trying to find other MOTU symbol t-shirts so that I can explore developing a few other mask designs.
What do you think of the next mask I’m currently working on?


PD: WOW! That is absolutely amazing! I cannot wait to see the final product! I’m sure this is a question many people are wondering right now: is this something that you do for a living, or is it just a hobby?
GC: Both really. I guess that’s what they mean by the term ‘an obsession’. I love working with paper and card. It’s an amazing material. You don’t require any really expensive tools or equipment to do papercraft. I used to be a toy designer/model maker for Hasbro, working on a construction toy range called K’NEX. Now-a-days, I’m a struggling freelance creative paper engineer, available to create things for publishers and licensing companies like, the mechanics for pop-up books, three dimensional greetings cards, promotional give-a-ways, novel packaging that sort of thing.
However, in my spare time I really enjoy creating paper masks and props for cosplayers and budding young directors to use within their own creative hobbies. I would love to make a living out of this “hobby”. I just haven’t figured out a novel way to achieve that goal yet.
PD: I hear you on that! But with your talent, I have no doubt that day will come for you! Have you considered selling your masks, or offering up your instructions for creating these masks online as a possible download, so that fans could give it a try themselves?
GC: This is something I have definitely been exploring. I get commissioned by a hand full of people per year who ask me to make them a specific design that they have seen on my blog (http://projectcutter.blogspot.co.uk). However, they are paying a high premium for this service. The demand doesn’t seem to be quite there at the moment for me to be able to produce these kits in enough quantities to spread the costs and make the price a lot more attractive to a much wider audience. I’ve even contacted various fan sites in the past attempting to find a good home for a few of my designs, offering them things like my Red Dwarf and ThunderCats props for free. Just so the fans can at least have an opportunity to make some of my stuff in the interim but surprisingly I have been consistently turned down…
Would you like your masks instructions and patterns for your website Dan?
PD: Would I? Of course! Thank you very much for offering these up! I’m sure the fans would love to have the option to try this mask themselves!
CLICK HERE TO DOWNLOAD THE MOSQUITOR MASK PATTERNS
CLICK HERE TO DOWNLOAD THE MOSQUITOR MASK INSTRUCTIONS
Glen, thank you very much for taking the time to share all of this information with myself and my viewers. And thank you again for helping me out with this amazing Mosquitor mask at SDCC. Without you, the Mighty Spector would have been victorious! 🙂


Amazing! I see a ton of potential new customers flocking your way my friend! Thanks Dan for this awesome insight!
Very cool. Thanks for sharing your process. I'm wondering if these masks could be sent in pieces to a 3D printer for fabrication?
Awesome !
Many thanks!
Great job! It's a pity that nowadays most people think this is "took much work to be fun". Glen should try to send some simple mask plans and samples to schools. I wish that has a kid, someone would have thought me how to make a Skeletor mask (or He-man, since he is more of a role model).
Another great work would be a life-sized Orko, with translucent paper and a lamp inside. And I may do that myself! Glen your are inspiring. Thanks. And thank you Dan for sharing this.
If it were me, I'd make a translucent filmation Spirit of Grayskull head as a lampshade… but would have to be made from polypropylene I guess.
I’d really like to know how to make this for myself in time for this Halloween
Oh wow! The patterns and instructions are right here in the article so anyone can go ahead and make their own! Let's take a look. MMMM HMMMM, So all we need to do is just…um…uh…we uh…what is this…I don't even… O_O
Seriously, nice work Glen but I would just end up with a large unusable pile of expensive paper. 😛
Richard – Trying something challenging is half the fun. I would suggest work on one small section first. and if that works out OK buy some more materials to try and make the next section. and so on… Take your time over it and before you know it you will have made yourself a Mosquitor mask. 🙂
This mask is too awesome